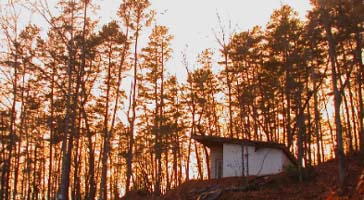
The glass faces these views, opening up this small cabin to the great outdoors. I enjoy standing in the unfinished cabin admiring the beautiful trees outside. Facing south, the windows bring in plenty of winter sunshine. The north side is about to be covered in protective dirt to keep the home warm when its cold outside.
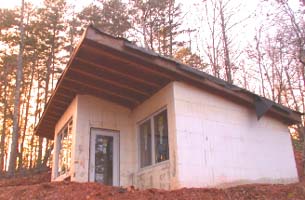
On the southeast corner of the cabin, seen in the second photo above, the roof extends out to provide some covered outdoor space, sheltering us from the rain or the cold north wind. There is another space just like this on the southwest side of the cabin, beyond the triple windows. We could have seating, or even a small dining table outside. We intend to have a patio garden to connect both of these spaces and provide access to the entry.
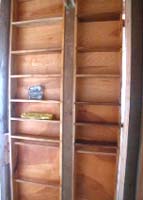
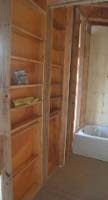
Since our cabin is extremely small, we are using every square inch.
As you can see in the photos below, the cabinets fit between the studs.
I designed them in this way to provide needed storage in the bathroom and closet.
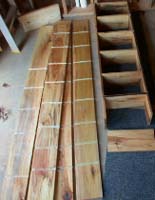
They are made from beautiful, locally milled poplar wood, with a hand rubbed tung oil finish.
We bought the wood green and dried it ourselves.
For the first couple of months we let the wood stay wet, allowing a black mold to grow over the wood.
Then we dried it out in the sun, and restacked the wood to let it dry for a year.
During this time, the drying wood absorbed the black mold, causing a very streaky pattern.
After planing the rough sawn lumber, this pattern jumped out.
You can see this in the boards on the floor in the first photo.
This is the most beautiful wood I have ever seen! We built and finished the cabinets ourselves.
The first photo shows a cabinet before it is assembled.
The others show the cabinets set between the studs in the wall.
Some of the cabinets have towel bars, 1" wood dowels.

Roof Insulation, March, 2010
We chose spray foam insulation in our roof to compliment our insulated concrete form walls.
The people involved said we should be able to heat this cabin with a candle.
But we ran into a problem. We were told that this insulation surpassed the fire code requirements
and would not need sheetrock ceilings.
(I wanted metal ceilings attached to the bottom of the roof joists).
But the inspector would not approve this.
We had a choice between 1/2" sheetrock and 1/2" plywood.
Sheetrock was not an option because we are avoiding all materials that support mold.
But there was not enough money in our budget for plywood and metal.
We chose 3/16" luan over 3/8" plywood.
This helped keep us under budget, but would make the inside of our cabin darker.
Construction is compromise.
We borrowed enough money to finish the cabin, but we are relying on the tax credit for new home buyers to repay this loan.
So the race is on to finish the cabin by April 30.
(April 30 is also the first day of the home show, so we are stressed).
The plumbers and electricians were called to finish their work.
We priced standing seam roof for the cabin, but it was too expensive.
So we decided to do the labor ourselves. My son helped and we did a pretty good job for never having done this.
Jimmy's Metal was very helpful with instructions.
The plumbers and electricians didn't finish until April 27. We tried to get them to finish earlier,
but their schedules would not allow this.
I called for the final inspection, but even though our tax credit deadline was April 30,
the inspectors didn't think they could fit us in.
After a lot of begging, one inspector finally agreed to inspect April 29, and the cabin passed!
The last step before move in was the electrical service.
The power company came out to see what needed to be done.
They warned me that they would not be responsible for cutting into water or sewer lines.
I was nervous about having to deal with a broken water main.
But they dug the entire trench without problems.
We moved in May 13.
What is life like for a family of three in 460 square feet?
It is better than we thought.
By careful design there is enough storage for everything we need.
All the clothes fit into our single closet.
The kitchen cabinetry is carefully designed to fit all we need in six drawers and a pantry cabinet.
We used a stainless steel table for a temporary island and work surface.
This will be replaced with a specially built island with storage.
But having this table is giving us a good idea of what size the island should be.
We are not done yet.
We need a patio and outdoor kitchen in front of the cabin.
The lime plaster walls are not done.
We need a water filter in front of the water heater.
And the cabinetry is not yet done.
But it is such a nice commute to work,
to walk down from my cabin to the office in the unfinished Mountain Model House.
In a summer heat wave we discovered that we can live without the air conditioning.
By opening the windows when it was dark, and closing them early in the morning,
the cabin stayed comfortable, even when it was over 95 degrees outside.
But an unusually cold winter cost an extra $150 in heating costs.
Not bad for all winter!
On cold, sunny days, the sun provides enough heat.
But we had to turn on the heat pump when it was colder than 20 and the sun wasn't shining.
We built the island, using a rolling tool cabinet we ordered from Sears,
and a butcher block top we bought at Ikea.
I added shelves down one end. A friend gave us two bar stools.
This island combines lots of storage, needed work surface, and a table.
And we can roll it against the cabinets when we need more space.
SEE OTHER ENTRIES IN OUR HOME DIARY BY
-Bonnie our helpful realtor can be contacted by EMAIL or by phoning her at 800-871-1910
Would you like to see this project under construction?
How to Contact The Mountain Home Show
Appreciation......
This web site contains information obtained from various sources.
The Mountain Home Show is not liable for the accuracy of this information.
Please contact the source of this information with your questions.
Final Plumbing and Electrical, April, 2010
Move in, May, 2010
Summer, Fall and Winter Living in the Cabin, 2010
CLICKING ON THE FOLLOWING LINKS:
(These will be updated throughout the project).
 Back to the Diary Home Page
Step 1, Purchasing the Land
Step 2, Designing Our Own Home
Step 3, Our Septic Permit
Step 4, Our Insulated Wall System
Step 5, Cutting Lumber from Our Own Trees
Step 6, Plumbing Before the Slab is Poured
Step 7, Pouring the Concrete Floors
Step 8, Pouring Concrete in the ICF Walls
Step 9, Framing the Wood Walls, Floors, and Roof
Step 10, Installing the Windows
Step 11, Roughing in Plumbing and Electrical
Step 12, Insulation
Step 13, Roofing Our Home
Step 14, Finishing the Cabin
I have friends in the construction industry who are very interested in this home.
In appreciation for their assistance, I would like to give them credit for their help,
and give you the opportunity to contact them.
The following list will be updated regularly:
-Tony of A&L Construction did the clearing, excavating, and sawed lumber from our trees. He can be reached at 828-835-9926.
-Pete is a very good part time carpenter. You can phone him at 828-479-9458.
Come to the next Mountain Home Show, and you will get an invitation to our open house.
For more informaiton, click on the link to "Detailed information about the home show."
If you are interested in building, you may also be able to make an appointment to visit.
Click on "Email Richard" to make an appointment.
Or perhaps you would like to observe the construction of this home on line.
Click on "Construction Diary."
You are welcome to visit often as we continually update it.
How to Contact Richard C. MacCrea
 My Facebook Page
(Design news and ideas)
Email Me
(Opens an email window)
800.738.8781 P.O. Box 446, Murphy, North Carolina 28906
Other Pages on this Web Site
 The Mountain Home Show, Home Page and Site Map
(How to find what you're looking for)
The Next Mountain Home Show Program
(For guests and exhibitors)
How to Get in The Mountain Home Show
(For exhibitors)
Articles
(About designing, building and remodeling a mountain home)
The Mountain Model Home
(A home that experiments with extreme energy efficiency)
The Mountain Model Cabin
(A cabin that experiments with small size and energy efficiency)
Construction Diary
(The joys and frustrations of building these two model homes)
Home Designing and Planning
(How to get plans for building or remodeling your home)
 Email Us
(Opens an email window)
Like our Facebook Page
(Join our Mountain Home Show Community for news and contacts)
The Mountain Home Show, P.O. Box 446, Murphy, North Carolina 28906-0446
The Mountain Home Show owes its success to the businesses that participate in the show.
They arrange such wonderful exhibits.
It is obvious that they take great pride in their work and our show.