The first wood framing to be done was the load bearing wall downstairs. This wall supports the floor beam upstairs and the ridge beam in the roof. All three must align perfectly. Columns inside this wall carry roof and floor loads down to the foundation. We protected the wood studs and columns from termites and moisture by not allowing them to touch the concrete. Columns were set on metal base anchors. I love using them. They support a heavy load, allow air to circulate between the wood and the concrete, and prevent wind forces from lifting the columns upward. To avoid using pressure treated lumber inside the home, I used surplus vinyl decking I got from a surplus building materials store. This decking is made of recycled vinyl and cedar chips. When we cut it, it smells like a gerbil cage.
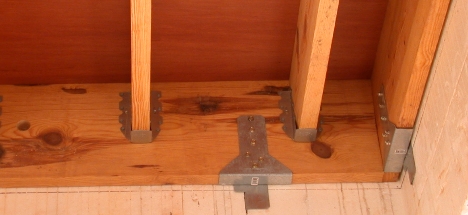
The wall studs are 2x6 rough yellow pine from the trees we cut down. The lumber dried clear and straight. We also used three rough cut 2x12 joists for the floor beam. At our first open house, there was more interest in the beautiful lumber that came from our own trees than all the other ideas I was showing.
I was impressed too, so I decided not to cover up the floor joists.
We planed them smooth and finished them with hand rubbed linseed oil.
Next was the question of how to cover the bottom of the upstairs floor sheathing.
(We don't want to see the sheathing between the exposed floor joists when looking up).
We purchased inexpensive quarter inch luan paneling, which we also finished with hand rubbed linseed oil.
Several of the panels came from the same tree,
so we arranged those together over the dining room ceiling for a beautiful effect.
The oiled floor joists came out yellow, while the paneling came out red, a bold contrast.
We will be leaving all the metal joist hangers exposed too.
This idea saved money, time, and gave us a beautiful ceiling that gypsum panels could never match.
I will be discussing with my electrician some cool ideas I have for lighting hidden between the floor joists.
After we finished the floor joists we put down floor sheathing upstairs over the luan.
We were careful to make sure our decking screws lined up with the floor joists,
or they would be visible downstairs.
We missed a few times, but we were able to take these screws out.
For our floor sheathing we chose Advantek.
These tongue and groove panels are made of glued wood chips and vinyl.
They have an excellent reputation for holding up to the weather during construction, even better than plywood.
They are also guaranteed not to squeek when installed correctly.
We needed to be extra careful that our floor would not squeak,
because this would be louder with the open floor joistsdownstairs.
My parents came up from Florida to help us build the floor.
When we got done we all went upstairs to test our floor, doing the "floor joist dance,"
jumping up and down to see how strong it is. We were all impressed.
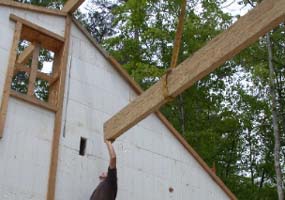
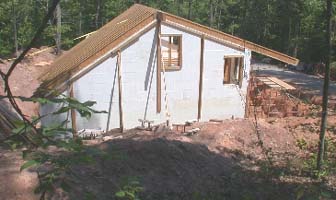
Next we put up the columns to carry the roof ridge beam.
We had to be sure these lined up with the columns downstairs.
Misaligned columns are a common construction error that can cause serious structural problems.
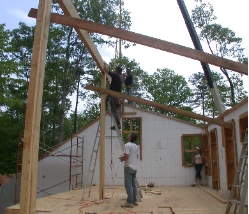
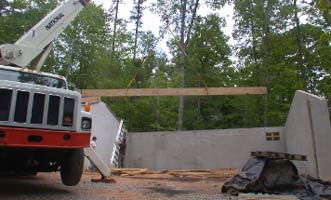
We leveled and braced off the columns. Then a crane set the ridge beams on top.
To keep the beams from tipping over and falling we braced them with two by fours to the concrete gable walls.
These beams are extremely heavy and could kill someone.
Our engineer specified a heavy metal plate to be lagged to the top of the columns and the bottom of the beams.
These plates do two things.
They secure the column to the beam
and spread out the load of the beam to prevent the beam from crushing itself where it rests on the column.
This could make a big difference if we had a heavy snow.
A little planning makes a much better home.

We designed a beam pocket inside this poured wall.
It is surounded with vinyl decking material.
The ridge beam slid right into this hole, and is bearing on solid concrete inside the wall.

A crane set these heavy beams.
The cost was only several hundred dollars and saved us a lot of time and sore muscles.
Can you imagine hoisting these beams up to the top by hand?
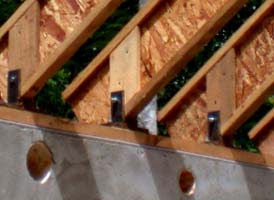
Our engineer, Porter Owen of Cherokee Poured Walls,
said we needed special clips to attach the roof joists to the tall concrete wall. There were two reasons for this.
The roof is very steep in this area of the home
and there could be a tremendous force pulling the roof joists away from the ridge beam.
Also, the backfill will exert tremendous force against this wall.
These metal clips will keep the wall from tipping over.
This has happened to homes in our area, once causing a death.
Porter handled the poured concrete walls that were not insulated
and fabricated and installed these metal clips for us. Porter's gift is engineering.
He has many progressive ideas and we enjoyed discussing these together.
He can be reached at (828) 837-9175. He is licensed in North Carolina and Georgia.
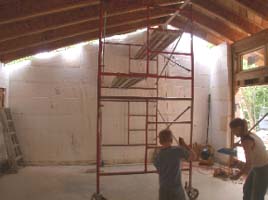
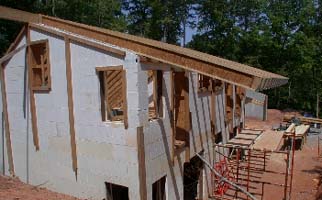
For our roof we used engineered wood I joists. They are much stronger and straighter than standard lumber.
They are installed differently, but once a crew is used to them, they are much easier.
For one, their lighter weight makes them much easier to lift up.
We installed metal roof clips, wood blocking and all of the nails specified by the manufacturer.
After sheathing the roof, we were amazed at how strong it is. It is stiffer than most floors!
This framing system and all of its connectors provide a much stronger roof.
A much better roof for no extra cost!.
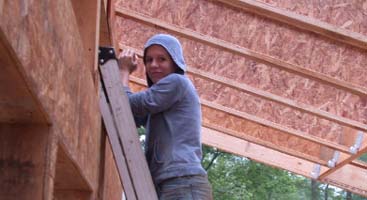
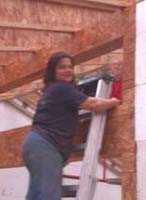
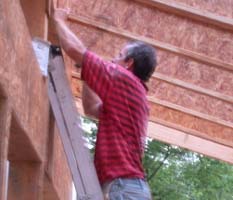
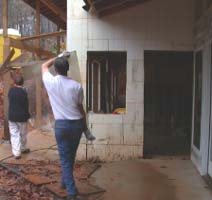
Here we are building the only wood frame exterior wall in our house.
I decided to frame this wall with wood because it is almost entirely glass.
We used two by six yellow pine cut from our trees, spaced away from all concrete with vinyl decking material.
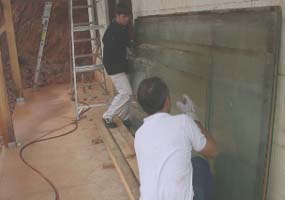
We sheathed the wall with OSB panels, made from wood chips.
Then we covered the sheathing with Tyvek brand house wrap.
This material is often misunderstood. Some think it seals in moisture, causing mold.
According to experts, it does not seal in moisture.
It is designed to allow vapor to pass through but stops air and liquid water.
This prevents air and rain water from leaking into the house while letting water vapor escape.
Because we had to be ready for windows the next day,
our family stayed up until 10:00PM finishing this wall with car headlights.
View of the roof framing from inside the office.
You can see the wood I joists, the yellow pine roof decking, and the metal connectors.
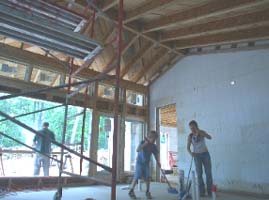
Straight and square framing is beautiful,
especially when you are doing the framing with the help of family and good friends.
Notice how well the ends of these joists line up.
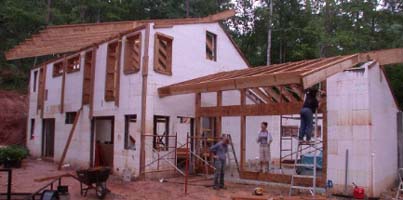
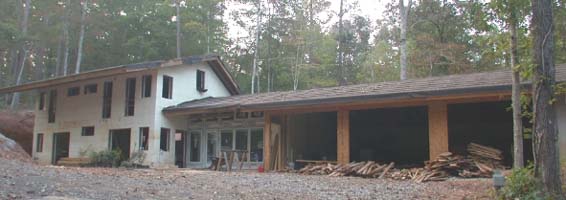
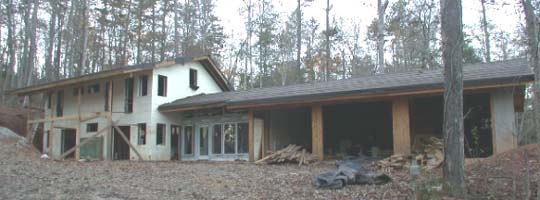
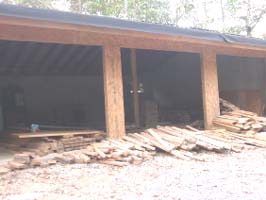
Framing the Garage and Solar Room, October, November, 2004
At an open house, one person asked me why I would build an environmental home with a three car garage.
That was a good question, but I was taken aback when she asked me.
Actually, the third garage door will be for my workshop.
Many houses have an entire basement for storage and workshop.
I have built only what I needed,
a 14 foot by 27 foot workshop with space for drying my own locally cut lumber
and building the cabinetry for my house.
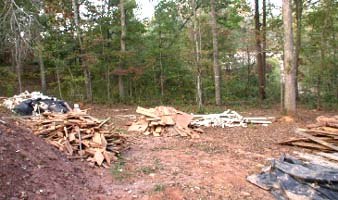
Can you see the piles of lumber in front of the garage?
We stacked these in different piles by length to make it easier to use all of the scrap.
You would be suprised to see how many times you can find a stud that can be cut just an inch or so
and be used again. Not only did we save a lot of money in lumber, but we used less trees.
Now the scrap pile is almost gone.
If you look closely at the photo above on the left,
at the base of the two story white wall behind the plants, you can see a pile of lumber.
These are thick posts and beams cut from the pine trees that were taken down to build the house.
They have been drying since last December, and they dried very straight. They are for framing the solar room.
That large roof overhang will be over a glass room that will be bringing the sun's free heat
into our house in the winter. The photo below shows the wood framing up for the solar room.
The house sure looks a lot better with some framework under that 8 foot roof overhang!
Now where could I find plate glass for my solar room?
Well, what would a modern do-it-yourself house be without "Ebay?"
My daughter teases me about being addicted, but I have sure saved a fortune!
A lot of the building materials on Ebay are left overs from other projects, or were misordered items.
Using these materials is a great idea.
I save money.
The seller turns his surplus stuff into money.
And nothing gets hauled to the dump!
If you check out my future Diary entries, you will see a lot of stuff I bought on auction.
For plate glass I needed single pane tempered safety glass.
Double pane glass would reduce the amount of heat gain which would make my solar room less efficient.
Regular glass breaks into large, jagged, sharp pieces.
But safety glass breaks into little bits that are much less dangerous.
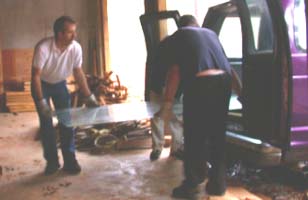
I won a whole pile of it for only $10.50! But we had to drive seven hours up to West Virginia to pick it up.
My son and I had a nice time together,
visit my aunt, and my 95 year old grandmother in the nursing home.
Her joyful tears alone were worth the trip.
There was certainly a van full of glass.
The gentleman who sold us the glass was glad it was going to a good use,
because he would have had to take it to the dump.
He said he enjoyed reading about our project on this web site
and wants a photograph of the solar glass room when it is done.
While we were loading the glass one piece broke. What a surprise!
The whole piece instantly crumbled into tiny pieces.
Close examination revealed that someone tried to score one of the other pieces.
That is a big no-no with tempered glass. It is impossible to cut without crumbling the entire piece.
So we left the last piece there, and the gentleman kindly gave us some other windows he was not using.
The first picture below is a close up of our lumber recycle pile.
The other photo shows all of the garbage generated by this project so far.
No, we don't have a dumpster. We are separating this refuse, to make it easier to reuse.
The leftover wood will be ground up into mulch.
The PVC piping can be ground up to take the place of some of the gravel.
The pile of white styrene pieces can be buried against the wall of the house before we do the final excavation.
More insulation is better.
SEE OTHER ENTRIES IN OUR HOME DIARY BY
-Bonnie our helpful realtor can be contacted by EMAIL or by phoning her at 800-871-1910
Would you like to see this project under construction?
How to Contact The Mountain Home Show
Appreciation......
This web site contains information obtained from various sources.
The Mountain Home Show is not liable for the accuracy of this information.
Please contact the source of this information with your questions.
CLICKING ON THE FOLLOWING LINKS:
(These will be updated throughout the project).
 Back to the Diary Home Page
Step 1, Purchasing the Land
Step 2, Designing Our Own Home
Step 3, Our Septic Permit
Step 4, Our Insulated Wall System
Step 5, Cutting Lumber from Our Own Trees
Step 6, Plumbing Before the Slab is Poured
Step 7, Pouring the Concrete Floors
Step 8, Pouring Concrete in the ICF Walls
Step 9, Framing the Wood Walls, Floors, and Roof
Step 10, Installing the Windows
Step 11, Roughing in Plumbing and Electrical
Step 12, Insulation
Step 13, Roofing Our Home
Step 14, Finishing the Cabin
I have friends in the construction industry who are very interested in this home.
In appreciation for their assistance, I would like to give them credit for their help,
and give you the opportunity to contact them.
The following list will be updated regularly:
-Tony of A&L Construction did the clearing, excavating, and sawed lumber from our trees. He can be reached at 828-835-9926.
-Pete is a very good part time carpenter. You can phone him at 828-479-9458.
Come to the next Mountain Home Show, and you will get an invitation to our open house.
For more informaiton, click on the link to "Detailed information about the home show."
If you are interested in building, you may also be able to make an appointment to visit.
Click on "Email Richard" to make an appointment.
Or perhaps you would like to observe the construction of this home on line.
Click on "Construction Diary."
You are welcome to visit often as we continually update it.
How to Contact Richard C. MacCrea
 My Facebook Page
(Design news and ideas)
Email Me
(Opens an email window)
800.738.8781 P.O. Box 446, Murphy, North Carolina 28906
Other Pages on this Web Site
 The Mountain Home Show, Home Page and Site Map
(How to find what you're looking for)
The Next Mountain Home Show Program
(For guests and exhibitors)
How to Get in The Mountain Home Show
(For exhibitors)
Articles
(About designing, building and remodeling a mountain home)
The Mountain Model Home
(A home that experiments with extreme energy efficiency)
The Mountain Model Cabin
(A cabin that experiments with small size and energy efficiency)
Construction Diary
(The joys and frustrations of building these two model homes)
Home Designing and Planning
(How to get plans for building or remodeling your home)
 Email Us
(Opens an email window)
Like our Facebook Page
(Join our Mountain Home Show Community for news and contacts)
The Mountain Home Show, P.O. Box 446, Murphy, North Carolina 28906-0446
The Mountain Home Show owes its success to the businesses that participate in the show.
They arrange such wonderful exhibits.
It is obvious that they take great pride in their work and our show.